Azure Blueprints are named adequately for what they provided cloud architects who want to quickly stand up a cloud environment that complies with a set of required standards. With Helm as the governance process engine, Microsoft makes it easy to get started. Blueprints can help address business risks outlined in The Five Disciplines of Cloud Governance by assigning resource groups, templates, policies, and roles consistently and proficiently across regions. It is important to remember that the cloud is a model – not a location, and we need to adjust the way we work and build in the cloud. Blueprints are a great start this transitional process especially in regards to Governance in the Microsoft Cloud Adaption Framework for Azure.
We will walk you through the steps to create your first blueprint in this demo so that you can begin to see how Azure Blueprints work directly with ARM Templates and policies. It is important to note that blueprints are meant to work within them, and not that blueprints are meant to replace them. In this example we will build a blueprint that contains the following artifacts:
- Resource Group
- Create a resource group to contain our other artifacts with a similar life cycle
- ARM Template
- Use Azure Quickstart Templates to quickly get up and running by implementing templates already created by the cloud community to set up a virtual network (vnet) with subnets
- Policy
- Implement a tagging policy to append tags to the previously created vnet
- Role-Based Access Control
- Assign a role of contributor to the previously created vent
Getting Started:
Sign into Azure account. (Sign up for free if you don’t have an account)
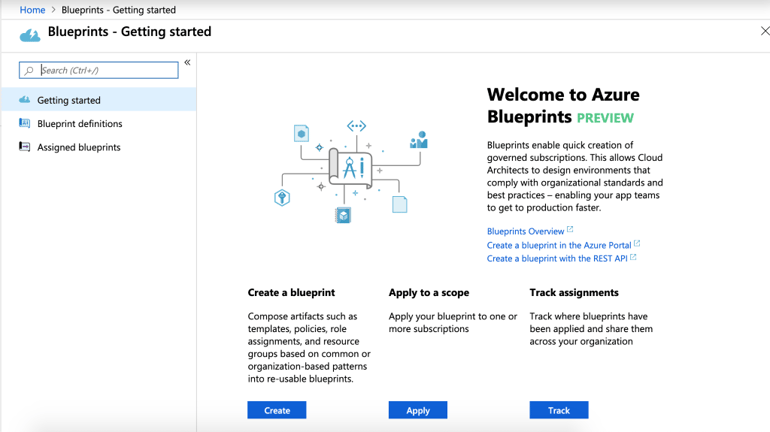
Search for Blueprints
Note that it is a service, not a resource. So the “+ Create Resource” button won’t get it done.

Click “Create” under Create a blueprint
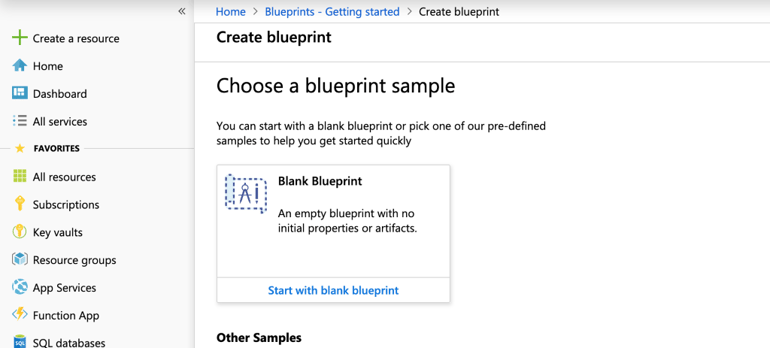
Click “Start with a blank template”
Fill in the fields to give your blueprint a name, description (optional), and then select the subscription you want your blueprint to located in.
- Suggestion(s) for naming: be descriptive when naming your blueprint
in our example we named our blueprint: demo-eus-blog-bp - demo (describe purpose – eventually in your environment maybe you’d use “dev” or
“prod” for development or production, but ours is just a demo) - eus (location where we’ll place the blueprint – east United States)
- blog (description of the blueprint — ours is for a documentation blog post)
- bp (to indicate this is a blueprint)
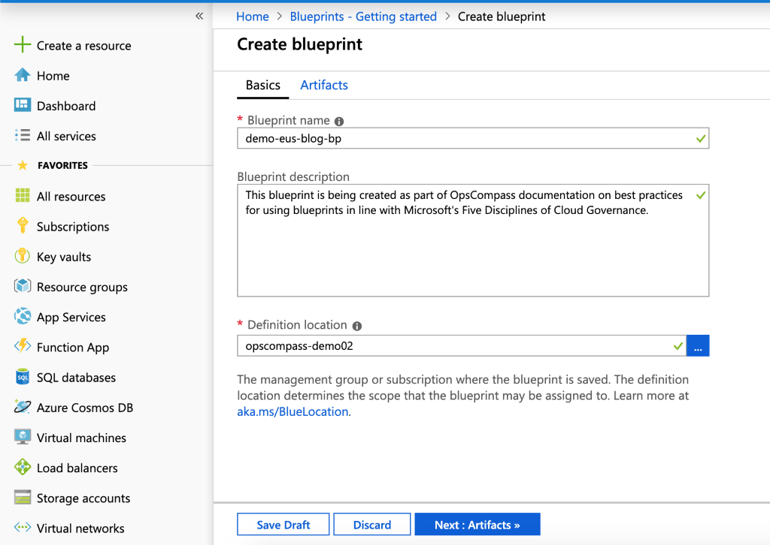
Click “Next: Artifacts” after filling out the field in order begin adding actionable items known as artifacts to your blueprint.
Artifacts Explained:
A few Artifact types to pick from:
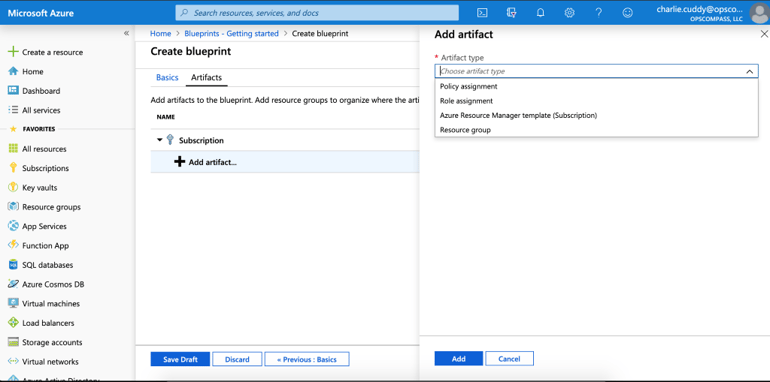
- Policy Assignment
- Custom
- Built-in (for ease of the demo this is what we will eventually select)
- Role Assignment
- Several roles to pick from (read through the docs for more info on the specific roles you are looking to implement)
- ARM Template
- For this demo we are going to use Azure Quickstart Templates on Github. There are several templates contributed by the community that can be copied and pasted in a blueprint template (will show examples of this in the demo), or that a button can simply be clicked to “Deploy to Azure” or “Visualize” (shown in image below)

- Note: If you are going to use ARM Templates you must first add a Resource Group first and then add the templates to it
- Resource Group
- Note: The blueprint will build in the order in which you artifacts are listed – keep this in mind as you add dependencies later on in your blueprint/cloud journey
Blueprint Note: When adding artifacts, you have to individually clean up everything your blueprints deploys, if you are going to test out some ARM templates I would individually do that first to make sure they are up and running before you deploy all the built-in features. This will prevent you from having to go and delete several artifacts when you want to clean up when you are done with the build.
Let’s Build a Blueprint: Adding Artifacts
You previously clicked “Start with a blank blueprint”
Now, Click “+ Add artifact…” under your subscription you want to use
Artifact type: Resource group (image below)
Create a name for the resource group following similar naming conventions as above
Note: ours now ends with –rg to indicate a resource group
(this is a standard naming convention in Azure)
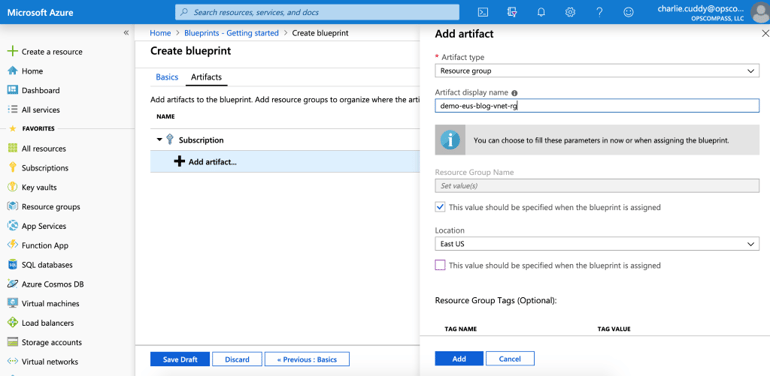
Blueprint Note: Through out the process of building a blueprint you will find the ability to either allow the individual who deploys the blueprint to set the parameters (in example pictured above: Resource Group Name “check box” is checked indicating that this value will be specified when the blueprint is assigned. To set parameters for the artifact that can’t be adjusted at assignment specify them at this step by un-checking the box and assigning the value now (in example pictured: Location will be set to East US and won’t be able to be changed during assignment)
Click “Add” to have this resource group artifact added to the subscription
You can now see (below) the demo-eus-blog-vnet-rg listed in the subscription
Note: You now have the option to “+ Add artifact” to either the entire subscription (like you just did above with the resource group) or you can “+ Add artifact” to the specific resource group which was just created (this is the route we’ll go for this example)
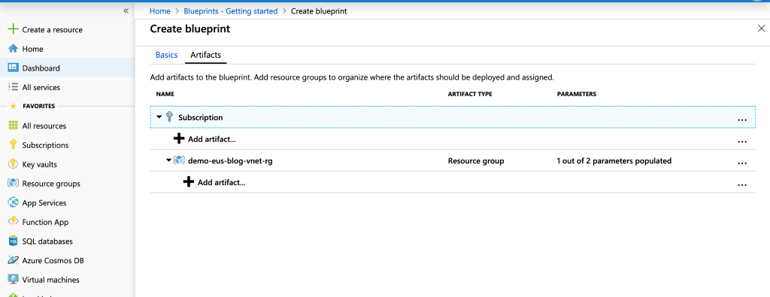
Add ARM Template to our new resource group:
Click “+Add artifact” and select Azure Resource Manager template from the drop down menu
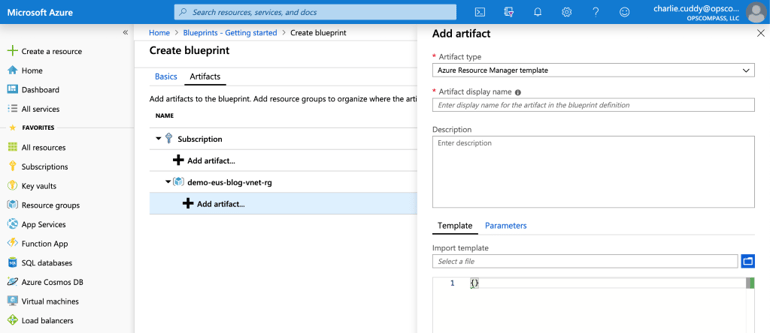
For this example, lets add a vnet with two subnets (therefore I will name this artifact something like “vnet-two-snet-temp” (because it is a template of a virtual network with two subnets). We do not need to create this template from scratch! Navigate to the Azure Quick Starts GitHub and search for ‘vnet-two-subnets’
Find the repo (below in orange) that does what we want for this example:
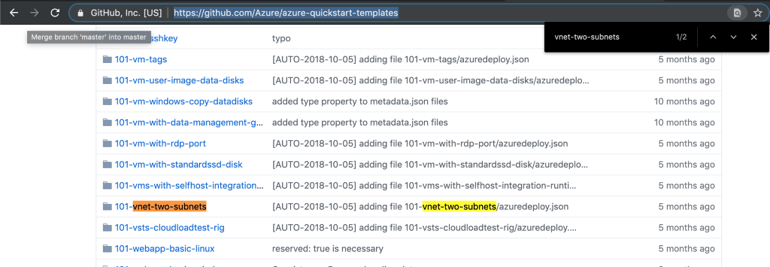
Click into it and see the files contained (below):
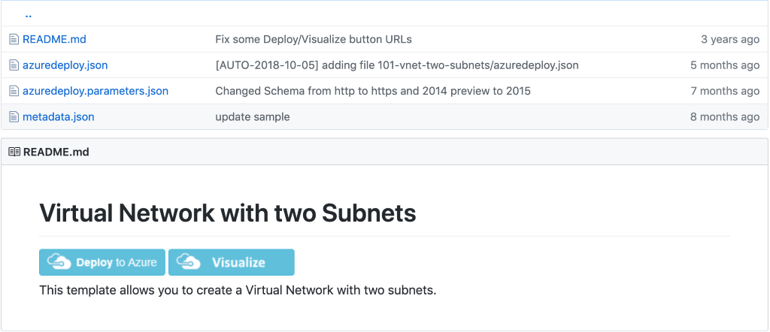
Note: could you could deploy to azure (and I suggest playing around with that on your own at some point), but for this example we’ll grab the content (small clip shown below) in azuredeploy.json (click that file to get the content)
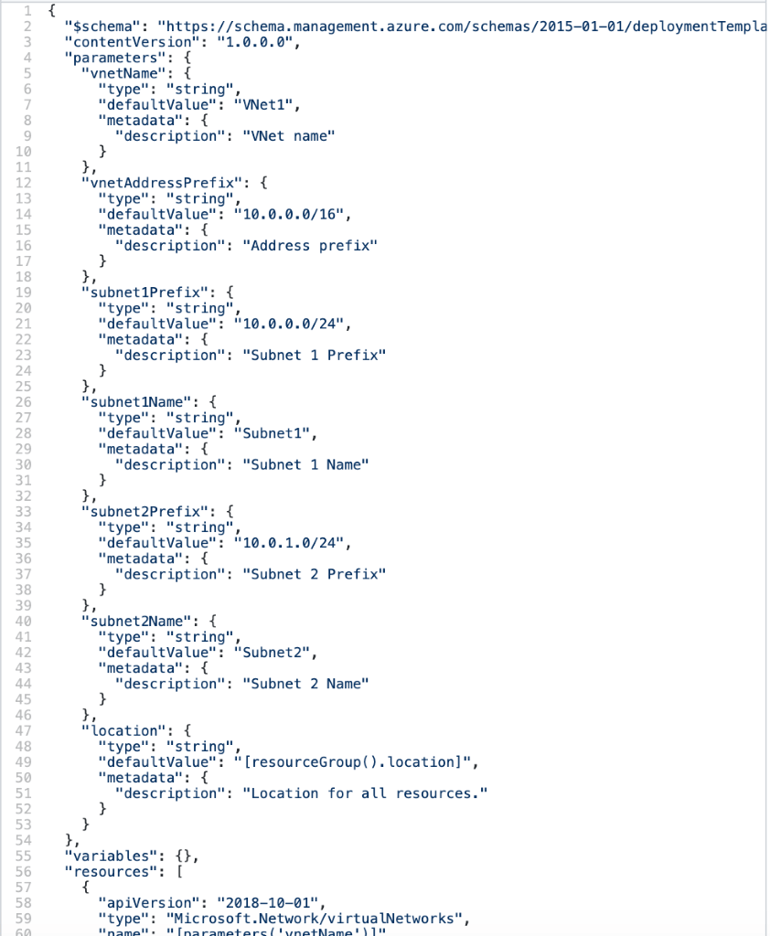
… and then we will paste that .json content it into our blueprint template (this process is described next)
Click “+Add artifact” with Artifact type: Azure Resource Manager template (if you haven’t already done so before we navigated to Github)
Set a descriptive name (like we’ve done before), add a description (optional), and then paste the template from the Github repo (from previous step… see image directly above for reference of what should be pasted in) into the template field at the bottom of the Add artifact screen
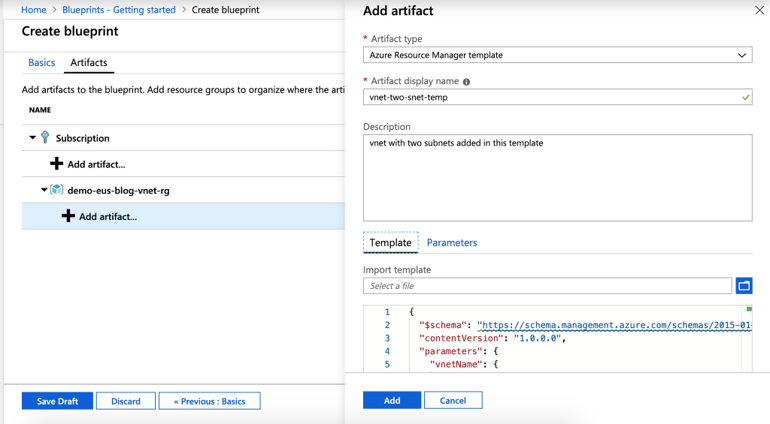
Note: after you paste the content into the Template, you can then click over into the parameters to see what was set from the .json file, and decide what you want to be adjusted by the individual who deploys the blueprint (like what you did with the resource group above), and what parameters you want to have predetermined for deployment (this process is spelled out next)
ARM Template Parameters:
For reference, in this example I unchecked all boxes and left the default values for the virtual networks and their subnets. You can set the parameters however you would like here.
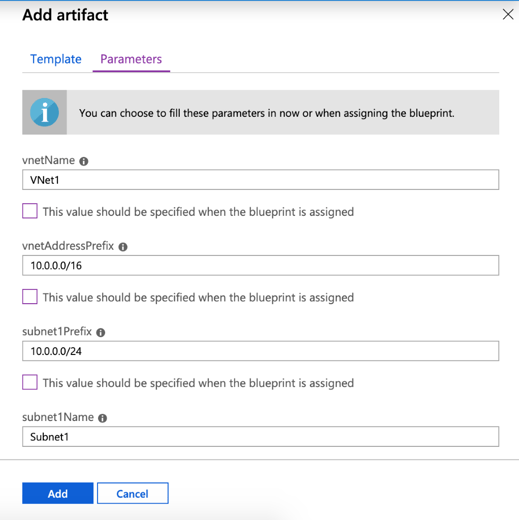
Personal Blueprint Deployment Strategy Coming Up…
After I get a template like this set up in my blueprint, I like to save it as a draft, publish it, and assign it at this point to make sure that the template is able to deploy before we fill the blueprint with more artifacts.
Tip/Suggestion: If I continued to fill this blueprint and deployed it, and there was a small error with the template then all of the other artifacts not dependent on the template would be deployed and would later need to be cleaned up when I’m done with the demo… if I have to make small changes 2, 3, or say 10 times that process can get annoying. I like to publish version 1 and get the kinks worked out in regards to the template (hopefully there are none, but often there is a small naming convention issue or something so don’t be discouraged if that happens) before moving on and adding more artifacts. Again, this is my personal strategy, and you may simply want to wait until the very end to “save as draft”, “publish”, and “assign”. If you don’t want to use my suggestion here then skip ahead to “Adding Additional Artifacts” and revisit the “save”, “publish”, and “assign” directions later.
Let’s dive in to how to “save”, “publish”, and then “assign” our blueprint.
Click “Save Draft” button
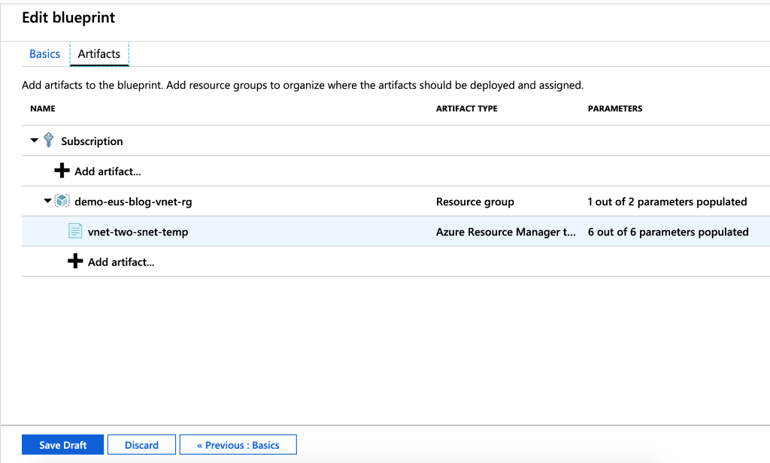
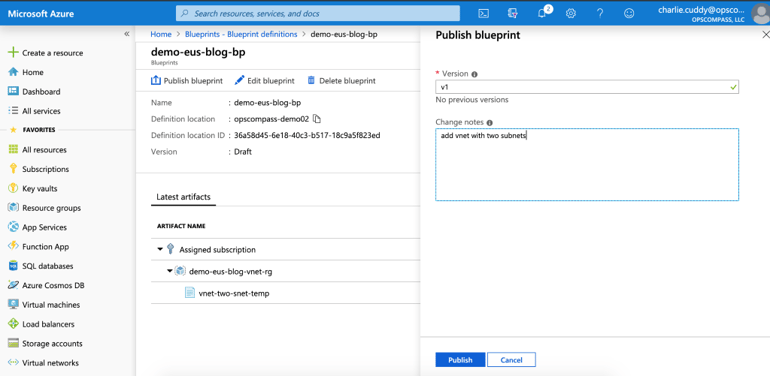
Click “Publish blueprint”
- Fill in the version field with something like: v1 (to indicate version 1)
- Write a small note to document what you added (optional)
Click “Publish” (it might take a few seconds)
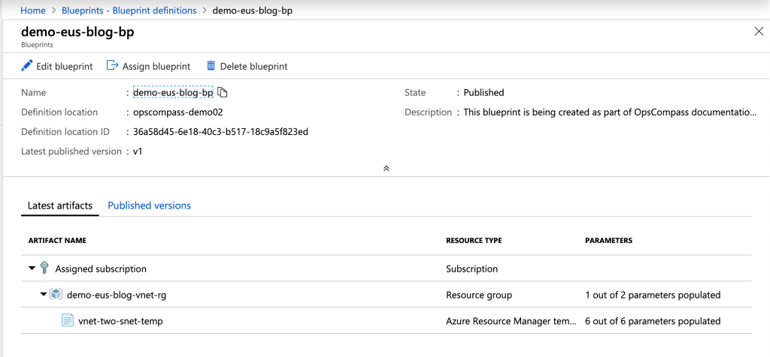
Now that it is published we want to assign it
Click “Assign Blueprint”
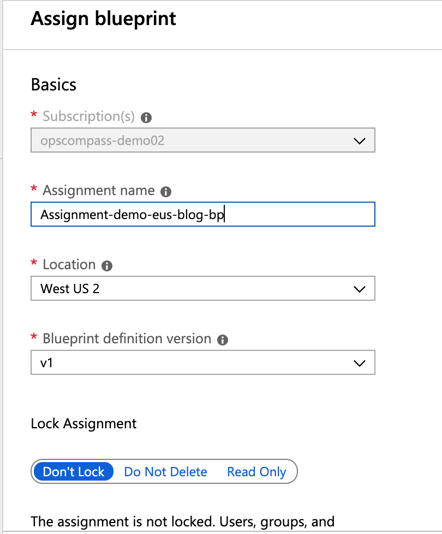
Set Assignment name (shown below) and make sure the version we want is selected (we only have 1 at this point so that shouldn’t be an issue, but note where that drop down is located so we can adjust it later as we make changes to our current Blueprint)
Scroll down the page to see the parameters for the blueprint template (some are predetermined and some may need to be filled based on how you checked/un-checked the boxes in the parameters tab in your ARM template). Fill in the parameter(s) you allowed the individual deploying the blueprint to manage (note: the parameters that are unable to be adjusted as we dictated on the previous fields via check boxes are there in shaded region, but unable to be changed)
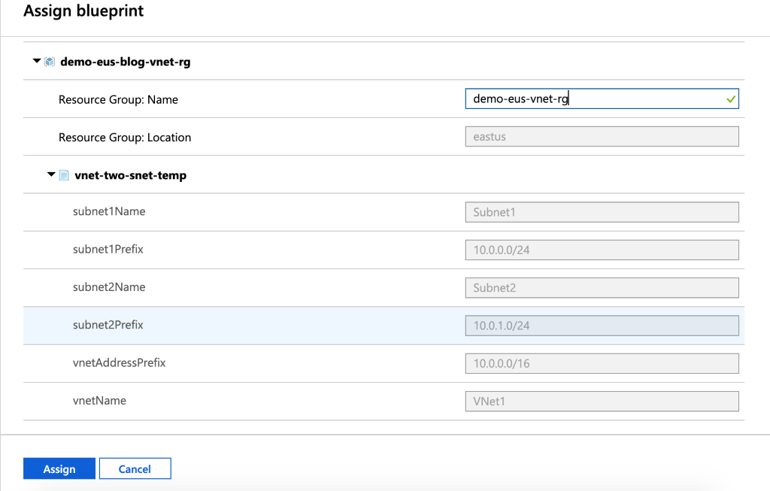
Click “Assign” for this assignment to be deployed
This can take several minutes, especially as your blueprint has more artifacts added to it
To check on status of deployment:
Navigate back to “Blueprints” (like when you first created your blank one) but now click on “Assigned Blueprints” and then select the assignment you just deployed (mine says Waiting in the photo below)
Note: ignore the blueprint: demo-cus-dl-bp v1.5 that says “deleting” as it is for another demo
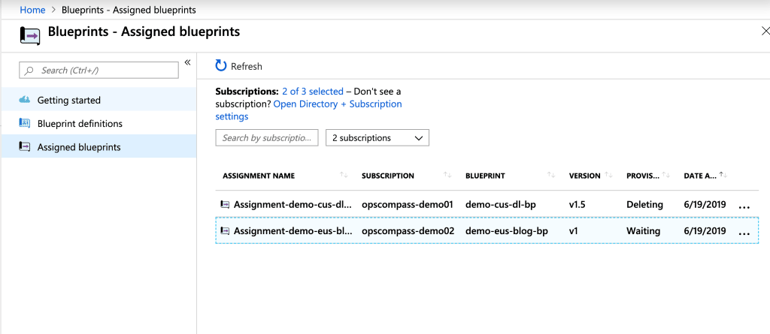
It will say “Creating” at the top… then after a few minutes you’ll (hopefully)see: Assignment succeeded!
Your blueprint was deployed with the Vnet – let’s navigate to see where it was built
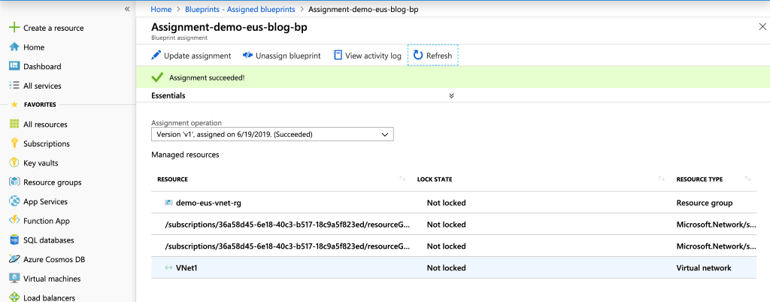
Navigate do your resource group (which was just created via the blueprint) through your subscriptions to see the vnet that was deployed via blueprint (image below)
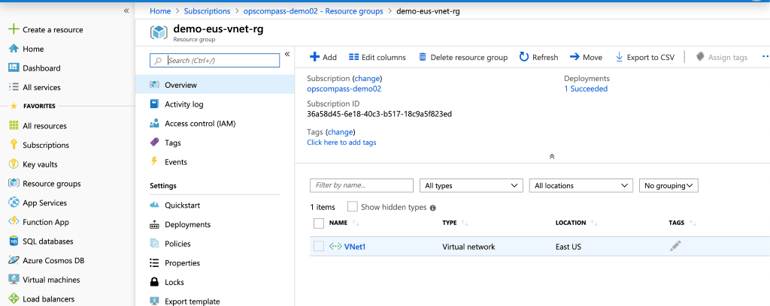
Now that we know there are no issues with deploying our template from Github, we can go back into the blueprint and add a couple more artifacts (in our example we’ll add a policy and role) into this resource group.
Adding Additional Artifacts:
Search for blueprints, but this time instead of creating a new blueprint under “Getting started” you’ll click “Blueprint Definitions” and select your blueprint that we just created.
Click “Edit Blueprint” to make changes to our current blueprint
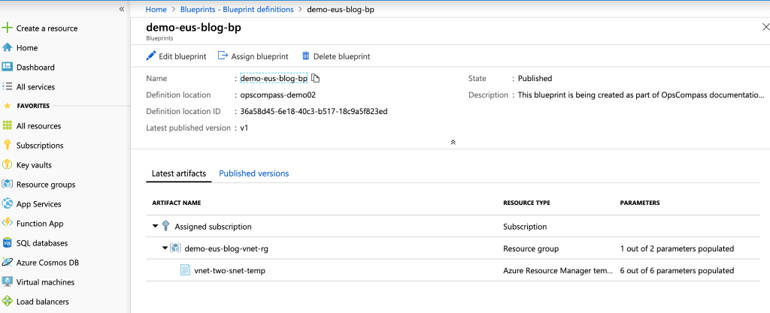
Click “Artifacts” and we’re back to where we were when adding our vnet (the process for adding more artifacts will be similar to how we added our first one)
Add Policy:
To assign a policy to our vnet-rg click the “+Add artifact…” that is within that resource group
In this example we are going to use a built-in policy that append tags and the default value (Feel free to read through all the different built in policy definitions to explore what other policies are readily available to you, and add as many as you would like to add to your blueprint)
- Select “Policy assignment” from the Artifact type drop down
- Select “Built-in” for the Type and search ‘append’ to find the policy we want to add
- Select the “Append tag and its default value” and click “add”
(See Below for Image)
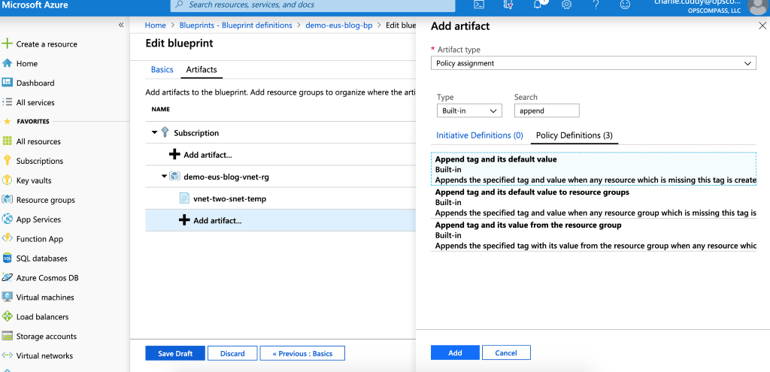
After it is added to your vnet-rg (see image below) you can click on the artifact and decide again (just like with your vnet) what you want to do in regards to the parameters (predetermine their value or allow the individual deploying to do so). After you’ve made your decision press “Save”.
Note: I decided to set the append tag name to Blog and value to Demo for this example
You should see your new artifact show up under the vnet-two-snet-temp artifact in your …-vnet-rg
Challenge: Add a few more policies to this resource group, or to the subscription as a whole
Add Role assignment:
Click “+Add artifact…” within the resource group that you want the role to be applied (we selected to place the role in the same resource group in which we’ve been working: …-vnet-rg)
- Select Artifact type of Role assignments
- Select what role you want to assign to for this individual
- You can then add the user you have in mind
- Or allow the individual deploying the blueprint to select the individual at that time (this is the option I’ve picked for this example)
- Click “Add”

Click “Save Draft” when you are done adding new artifacts to ensure that these changes will roll out in your new version of your blueprint.
Next, click: “Publish blueprint” (just like before)
Update the version number (something like v1.1 to indicate a small change to v1), and write a
brief description (optional)
Then click “Publish”

Navigate back to “Blueprints – Blueprint definitions” (where you first created a blank blueprint, and more recently selected “Blueprint definitions”), but this time select “Assigned blueprints” and click on your Assignment from the list (this will give us access to our original assignment… which we are about to update)
Once your assignment is pulled up click “Update assignment” (you can see my screen (below) is still showing that our first Assignment succeeded)

Note our Assignment name is the same (and we don’t have the option to change it) because we are simply updating the original.
We do however need to select our new version (v1.1) from the drop-down menu

(the parameters below will change when your new version is selected above)
Scroll down and set the parameters (notice the new tagName and tagValue from the append tag policy are already determined as “Blog” and “Demo” as I selected previously, but I must select who I want my contributor to be from the drop down menu since I decided to wait to pick this individual until deployment when I was adding the role).

After you add your contributor…
Click “Assign”
After waiting a couple of minutes… you’ll again (hopefully) see Assignment succeeded!

If you navigate back to your resource group you’ll notice that our previously created VNet now has the applied tags (see image below Blog:Demo) that we appended via the policy in our blueprint.
Although you don’t see in on this screen, our individual who was added in the previous step is now a contributor on this resource as well.

You have successfully used a Blueprint to deploy a resource group, and a virtual network with two subnets into it from the .json that you pulled in from Github. Then you went back into your Blueprint, edited it by adding policies around tagging, and RBAC. Finally you successfully updated the original deployment to take on this new version of your Blueprint. Remember, OpsCompass’ Helm seamlessly works with Azure to help with you risk, compliance, and costs as you grow with your public cloud.
Additional Resources to push help push beyond this demonstration:
